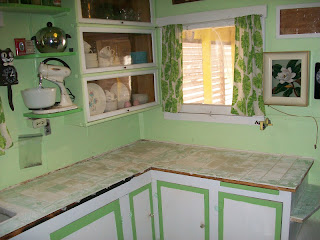
Its only taken four years, $551.00 countless arguments/ breakthroughs/ and finds but it has all paid off! When I bought the Casablanca in spring of 2005 the only thing "original" to the kitchen aside from the cabinets was the green & white checkerboard floor. The "Kitchen renovation" really didn't take off until I found my 1952 (Mamie Eisenhower PINK interior") Norge refrigerator .
(It just needed love)
It had been in my Grandma Jordan's store house since the 1980's It looked rough, but I saw beyond that and after I plugged it in a discovered it worked I pestered asked dad to help me repaint white and make it look new again!
(A fresh coat of "Buick- Frost White")
(Ta-Da!)
(Circa Spring 2008)
It took some rearranging, but I finally found the perfect spot for the fridge and the china cabinet. It was about this time I had the house wired for telephone-(Vintage reverse painted lamp and rotary phone what else!)
I of course wanted a vintage rotary wall phone for in the kitchen, so friend Katie and I went hunting one Saturday. We hunted all over town and hit one last Antique store I'd never been in and alas, it was a bust on the rotary phone search. We were walking out when Katie hit me in the chest and said "Oh my God LOOK!" and it was love at first sight-It was owned by Pearl Kirby (There is a Middle School in Wichita Falls named after her husband!) It is a 1954 all electric single oven with special "sunken well" attachment on the back burner. It was the first Electric stove sold by Hamilton Bryan in Wichita Falls, and it was practically mint!
It was a short lived romance, with a price tag of $750.00. However I'm not so easily deterred, I got to talking with the owner and two and a half hours later we had a sale price of $250.00 SOLD! I argued with my parents for months over if I was going to by the stove or not. (Little did they know I had already put money down on it!) Two months later August 6, 2009 it was on a trailer headed for the Casablanca.
Dad and I had to wire the kitchen for an electric stove as it had never had one, the heavy duty copper wire cost MORE than the stove did but it was all worth it in the end!
With the Stove in I turned my attention to a part of the kitchen that always bothered me- the kitchen ceiling that had its original 1943 green paint on it started peeling!
So begrudgingly an entire refurbishment was carried out in the kitchen in January of 2011.
(Thank goodness for friend Savannah!)
(Friends Caitlin, Jenny and Patricia too! The work went so much faster)
After completely repainting the kitchen (in the same colors I'd painted the first time) It was finally time to tackle the long awaited project id had on the back burner for three years now, of the counter tops.To this day I'm still not exactly sure what was used to do the counter tops in 1943... I wasn't Formica, it wasn't cork or wood. I do know that every time you spilled something on it whatever "it" was absorbed and warped, so it had to go! I knew I wanted to do some kind of tile, but didn't know what color or pattern (something in green, of course). Then one day while at Habitat for Humanity I spotted some mint green tile on a lower shelf. BINGO! I got 190 tiles for $20.00 but they still had glue on the back of them and needed to be cleaned.
It took almost a week of soaking them in bleach and scraping them but in the end I had 190 perfect, vintage mint green tiles in my possession. TAKE THAT LOWE'S! Many of you will recall me asking what kind of pattern I should lay...
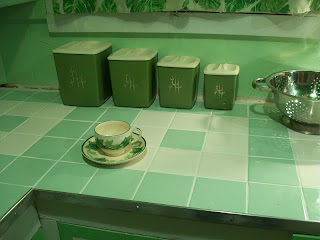
And finally after a Sunday family viewing of the movie "The Untouchables" and saw how a 1930's kitchen was tiled in white squares with a mint green border, I decided on this pattern...
That was nearly Three Years Ago! I cant tell you how many times I'd unload the counters with hope of getting them done that weekend, and yet another weekend going by with out. For the longest time they sat on the counter loose just like they are in the above picture. So in all my brilliance I decided 4th of July weekend 2011 that "I'll tear the counter tops off, then I'll HAVE to get them done faster."
Well they stayed bare and ugly until two weekends ago!
(Cue in Debby, Tile Queen of Lake Diversion!)
Friday Debby finally had time to come out and do the counters, with the help of her tile cutter and my mother for company the project was on its way!
Like any home improvement project we hit some problems, like running out of tile glue mid project, thinking we'd run out of the vintage green tiles! (Thank goodness they were just hiding in my storage unit!) and a colored grout mix up, They shouldn't put BLACK grout in a WHITE bag. -Just Saying
A few more trips to Lowes and all the tiles we're laid, Saturday afternoon came the grouting around 4:00P.M.
The all cleaned up for a dinner party!
Sunday morning I started putting the original chrome banding back on the edges of the counters. There was a tiny space between the bottom of the counter top and the bottom of the banding (from the added height of the tile and glue) I remedied the problem by painting the cabinets edges with silver Ex-O rust paint and you cant even tell!
(The way the tile looks with my prized American Ivy "I love Lucy" Franciscan dishes, I'm smitten.)
With our custom 1959 Formica kitchen table, and 1930's wooden china hutch full of Pyrex everything is just about perfect!
(I keep postcards from our friends in a bowl on the table!)
It's kind of funny everything in this room being "finished" and Ironic that it will only be that way for three or four months until we start adding on to the house. Until construction beings, we'll enjoy it as it is- and how I've always felt it was meant to be. Simple, modest and fit to be a set on "I Love Lucy", our perfect little snapshot of life in 1954.
(Patricia lady of the house, and Myself)
-Mick-


20 comments:
Congrats!I'm so happy for you and it looks awesome!I just moved into my home in November and I fear my kitchen remodel is going to be a few years in the making.This has inspired me that the wait is worth it in the end though.
It looks fantastic Mick!! I love the tile pattern. Everything looks as though it's been there forever. Great job. Now can you and your friends come out west and build me a house?
Love everything about your kitchen! Congratulations to you on the completion & I hope you have many, many years to enjoy your hard work!
That just looks stunning! So fabulous! Wow I wish my kitchen looked so great. We don't intend to stay in this house so I would hate to get it looking like yours does, knowing we'll eventually move, but yours looks totally awesome!
Beautiful job.Just love the counter tops.It really looks great.
It all looks great!! I really like that fridge, and your solution for the countertop edging. I need the inspiration since I'm aiming to finish out kitchen with a budget much like yours. Nice job!!
LOVE IT! IMO, The best remodels are the ones that are done in stages. I loved seeing all the stages of your kitchen and watching it progress.
MaryD
That is so perfect! I love the green and white color scheme- the green tiles and lustroware look so awesome together!
I love your appliances, and the pattern you chose for your countertop is fantastic! You did an unbelievably cool job.
Mick, Your blog always brings a smile to my face! Love this post and how much love you have put into your vintage abode :)
I am sharing this on my fb page.
Mick! EVerything looks amazing! Love the green! love the countertops!
It looks like four years well spent. You have spent quite a bit of that time focusing on your friends and family. That is better than a fast project. Especially when they help you ;)
I LOVE IT!!! Man, you do such great work!
I LOVE IT!!!!!!!!!
Gorgeous! I'm jealous, but soooo happy for ya!
It looks wonderful! I love your color choices, the different shades of green are perfect. And your fridge and stove are to die for! And good work on haggling that fridge down to such a good price!
Very nice! Congrats!
Love that oven.
Mick, its Gorgeous! It looks like a kitchen in the Emerald City. The tiles turned out so beautifully!
OMG I love your kitchen! totally jealous. I have a chair just like yours but only one ~sigh~
Post a Comment