Wednesday, April 24, 2013

Don't Let The Screen Door Hit Your...

Pardon my absence Dear Readers, I've been off having adventures to regale you with!
While I was gone friend Kyle came to the Casablanca and installed a lovely set of screen doors on Pontipee Hall.
I know this sounds like an odd combination, after all the work that went into getting the french doors to Texas, then having them framed and installed. "SCREEN DOORS?! OVER FRENCH DOORS?!" I hear you cry-
Well it might not be in vogue, but I think its marvelous!  The way the original part of the house was built in 1943, the front door faces the Southeast. This, by some miracle of early 20th century house building draws the cool breezes off of the lake. I mean really, on a day with no breeze if you stand in the door way its like being in a wind tunnel! Truly good old fashioned know how. Well when we planned out the addition this never even crossed my mind, but the french doors face exactly the same way and angle of the front door and draw a wonderful breeze. So now with the screens to keep bugs out, its quite wonderful to sit in living room at nite and read a book under the glow of the Sputnik or play a round of cards!
Little by little progress ebbs on, I'm hoping to make some real leaps and bounds over the summer! Saving my pennies and pay checks for some of the bigger projects, I hope to have real paint-able walls by labor day!

Hope all is well with the rest of my Blogger Buddies!

-Mick-


Friday, April 5, 2013

I'm Late! I'm Late! For A Very Important Date!

No Readers, this is not a Salvador Dali painting! I did a little set dressing for the Wichita Theatre's show "Alice In Wonderland" and this was the setting for the 'Mad Hatter's Garden'  I really enjoy all the back history to Lewis Caroll's wild tale. The phrase "Mad Hatter" comes from Edwardian/ Victorian times when Hat makers would brush Top Hats with Mercury. If, and often times the Mercury would be absorbed through the skin and cause Mercury poisoning causing one to become very ill. "You're as mad as a hatter".
So why clocks? Much like Hatters, Clock making also had its dangers.  Pocket watches of the era would have the numbers on their faces painted with Radium (to make the numbers glow). Often times the smaller and finer the numbers were painted, a higher price could be yielded for the watch.  In order to get a fine point on a paint brush, clock painters would lick the brush with their mouths  into a point. With time the small doses of Radium would do enough damage.
While I did not obtain Radium Poisoning on the job, I did have to create a giant pocket watch for the White Rabbit. As for being 'mad', well haha..."we're all a little mad, aren't we?"
I formulated an Idea for the large clock using cardboard. As you can see in the photo above I started out with a few pieces of Card board. I used a round dinner plate to trace my two circles. I them cut enough card board in 1" widths to circle the circumference of the clock.
Using masking tape, I worked my way around the edges making the cardboard supports and sides. I find for edging things in cardboard (especially circles) If you will crumple up the edging pieces to give them a little bit of give it will take the shape much easier. After one side of supports is done you tape the other circle on from the outside. I then covered the outside edges of the clock (the 1" pieces) in maskign tape a few more times to make it sturdy.
For the clock faces, I used a slightly smaller plate for the round pattern, painted them white, and then used permanent marker to write roman numerals on the dial face.
(Nearly completed dials)
 (Ta-da! And YES the dial is supposed to be crooked!)
I then spray painted the body of the clock gold, let dry then glued on a clock face to either side. For a "Chain" I used an old gold curtain pull  tied at the top of the clock inner support. I love the tassel!

And thats about all the cool stuff I did for Disney's "Alice In Wonderland Jr."

-Mick-


Wednesday, April 3, 2013

Grease, 1959 - The Set Post

Well Dear Readers and Followers, here it is...
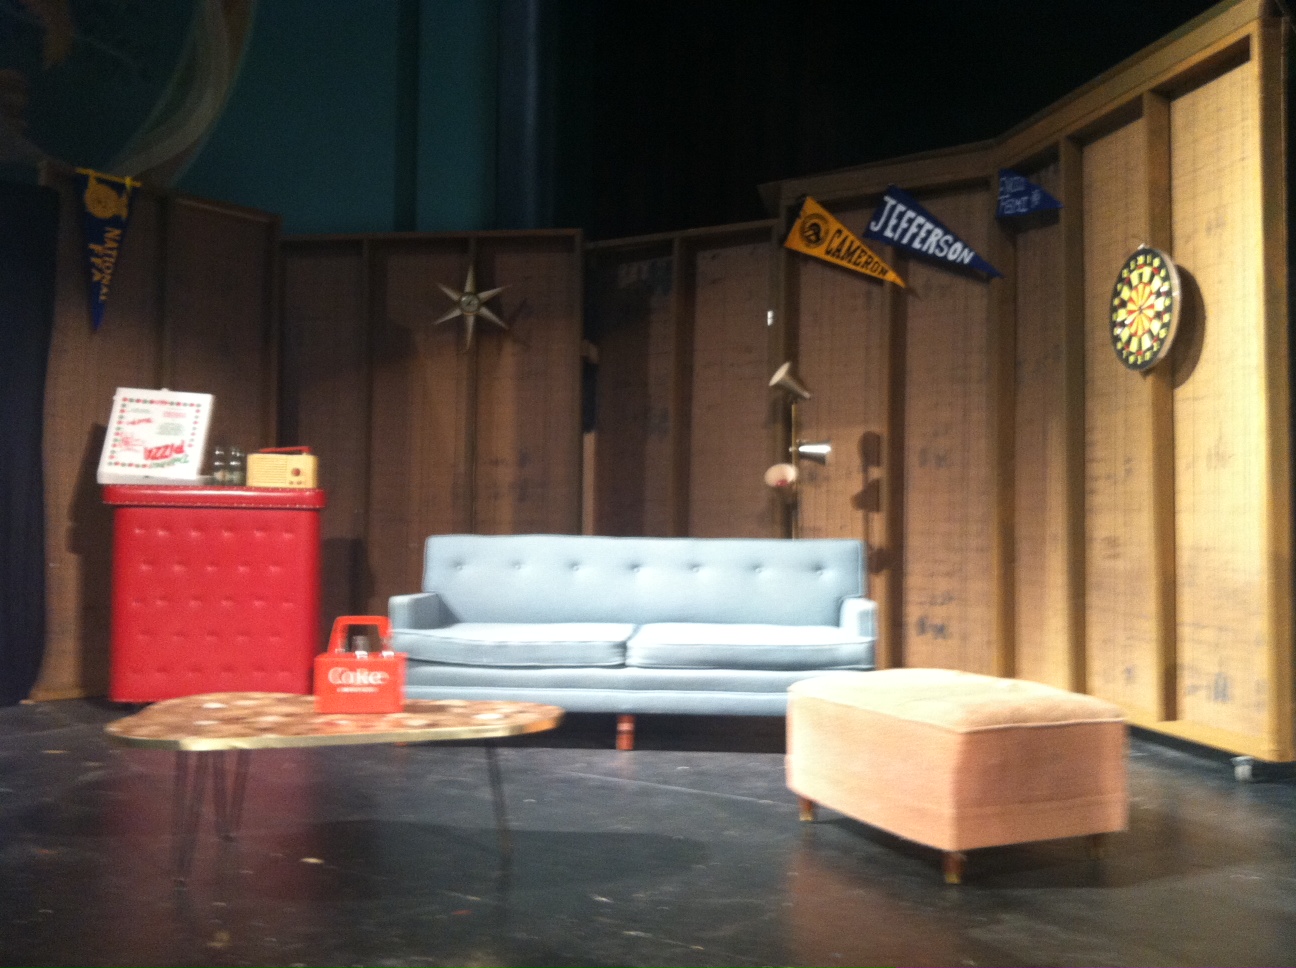
(Jan's Basement)
I do not claim to be an expert on Grease, but- I love the 1950's, I love the show, and I've been singing along with the original cast record album since I was nine. I was slightly upset when I found out we had been given, and were required to stick to the "High School" version of Grease (this is a cleaned up watered down version of the actual show) I much prefer the real and raunchier version that Jim Jacobs and Warren Casey originally penned. I have had lots of fun with this production and plan to do "Grease" again!  Early on in the design stages I set out with two goals, "Having the sets look nothing like the 1978 Movie, and 'Marty's room" was not going to be pink!)

My Project included-

-Marty's Bedroom
-Jan's Basement
 -The Flamingo Drive-In Theatre
 - Refurbishment of Greased Lightning
-Along with all set dressing and props

For this production, I wanted the sets to be more actual-to-life than poodle skirts and saddle shoes. So I tried my best to keep thing period appropriate, as well as catching to the eye. What I love about the setting being 1959 in the "earlier suburbs" of Chicago, is that everything had "happened" all the cool stuff was established and in middle class homes.
(Marty's Coral Bedroom)
Mart's room started out as my favorite, so set against pink was I that when choosing a coral paint color I went for more of a "coral orange" I must say Coral and Brown has grown on me!
Here we have My favorite fountain table, turquoise boomerang lamp with fantastic fiberglass shade, black rotary phone and lots of other goodies!
(The vintage movie posters were a Kansas trip find.)
(The 'Annie Get Your Gun' poster is direct homage to
 the wildly successful production we did last season!)

(Notice the color difference between the pink radio, and the coral walls)
I know the odds of a teenage girl having her own television set in her room in 1959 are slight, but lets pretend that Marty's father owns a used car dealership... yeah, that's it.
The basement set, in the end beat out the bedroom for my favorite set. (I'm sure it has nothing to do with all of my furniture being in it.) In fact this set almost didn't happen. But thanks friend Bryson's building skills, and Friend Austins help painting it all came together just in time.
Even though this is a "cleaned up" version of Grease I made the argument that ANY 1950's middle class family with a somewhat finished basement had a wet bar in it. So the compromise was "cokes" instead of cocktails, (Personally all this set was missing was a case of Schlitz beer!)
I love that my couch is in Grease! Haha I also feel that  while set has a more masculine feel, it is not overly so. A nice balance I think.
("Local College" pennants for a little period accurate decorating.)
(I love this clock! A Missouri find!)
In the script, Danny and Sandy go on a date to "The Moonlight Drive-In Theater" but how could I resist?! The Director agreed to change the name to "The Flamingo Drive-In Theater" and I happily hauled the sign boards home from the Casablanca. I added some grass to camouflage the supports, along with a weathered "Exit" sign (to signify the car being on the back row.) 
(First step, painted a piece of wood as a black and white exit sign)
(Second step, create "rust" by distressing with a sponge and red paint.)
When the show was last staged in 2010 The cast ripped apart and converted a 1995 Toyota pick up truck into a "convertible" for Grease lightning.
(As it was, left from the 2010 production)
Not wanting to present the same car as the last time they did the show, Greaser lightning underwent a paint job. Having already used red as the "cool" color It came down to either a new black paint job, or Turquoise...
(After two coats of spray primer.)
To avoid streaky brush strokes, the car had to be painted with spray paint, it took nearly $45.00 worth to get the finished look of  an auto paint job.
After applying four coats of Krylon's "Ocean Breeze Blue" (Turquoise) the paint job was looking pretty good!
After two days of letting the paint dry and cure, I reverse taped the cars flames to be able to spray them white. I had pitched and played with idea of the cars flames being a base color of white and having silver in the flames.
It's hard to see in this picture, but I couldn't get the silver spray paint consistent enough to create shading. It looked more like the car had been graffiti-ed vs a custom paint job. So in the end I opted for a white base with black detailing.
(It was more exciting in person!)
Add on a Chrystler grill, a Chevy grill plate, lamps for head lights, with painted white all tires and REAL "moon" hubcaps and here you have....
With the lights, adrenaline, and music blaring this became the coolest thing on four (er- two wheels) Greased Lightning!

I loved designing and dressing these sets. Its no big secret that the 1950's are my favorite time to recreate. While I got to use a lot of my "A-list" pieces on these sets I tried to retain a "real to life" feel v.s. a more nostalgic pink/turquoise/checker board floors/ jukebox/ "Happy Days" set and we received praise in the review for just that!

-Mick-


Monday, April 1, 2013

This Is NOT A Stain Glass Window.

Its not dear Readers. It really Isn't.  It is however, an eight foot eight inch single pain glass window...and it was Free!  Dwane, my Boss at the Theatre gave it to me just to get it out of storage! All I had to do was haul it away.
With the help of friend Zack and his truck we did just that! This window will replace the bay window I previously wanted to put in the new living room.

The bay window was very heavy and would have required a lot more support to be built into the wall. With this new flat window we'll be able to get in installed a lot faster!
I was so tickled that we got it to the lake in one piece! A huge thanks to friend Zack for helping me move it out there! Now, the "stain glass" on the window is really just paint, apparently this was a set piece in a show once upon a time and they just painted over a regular clear window to create the effect.  I had actually planned to scrape the window down at a later date but with the help of the lovely Patricia, Alex,  and Corabelle we were scraping in no time.


With a lot of elbow grease and putty knifes we had made short work of the window in a little under two hours.
The secret to getting that long dried paint off the glass? Scrubbing Bubbles toilet cleaner! We sprayed the foam and waited about five minuets, and then paint all but slid off the glass with the putty knife.
Now all I need to do is re-caulk the joints, then tape and paint it white and it will be ready to hang.  I really hope to have it in before my birthday in June.

Fingers crossed for a summer hopefully packed with knocking out and finishing up home improvement!

-Mick-